Volumes in Kubernetes are used to store data used by our applications. So that concept is very similar to volumes in docker containers. But there are some subtle differences, as always in life; nothing can be simple. :) There are many types of volumes in Kubernetes, and in this post, we will group them by properties and see some of the most common types. Like with docker, we will group them to local and remote volumes.
Local Volumes
By Local Volumes, we mean volumes that are created on the worker nodes where the pods are running. These volumes have
limited persistence but still are useful for cases like caching, temporary storage, logs, etc. These volumes are also
called ephemeral volumes. These volumes are specified inline in the pod definition.
Lifetimes of Ephemeral Volumes
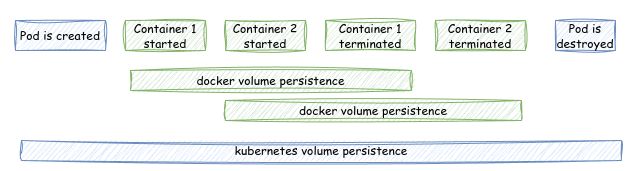
In Kubernetes, usual volumes persist beyond the life of a container, but not beyond the life of a pod. That makes sense, because a pod is the smallest unit of deployment in Kubernetes. It surely helps with scaling the containers in the pod while the volume is shared between them, and thus the data is available to all of them.
Ephemeral Volume locations
Another difference is that while in Docker, volumes are usually all local and created by the user, in Kubernetes, volumes are created by the system somewhere in the cluster. For example, in docker you were able to bind a local folder to a container.
However, in kubernetes you don’t know which worker node will host one or more of your pods, therefore, we will need to learn how to tell kubernetes to add volumes for our docker containerized applications.
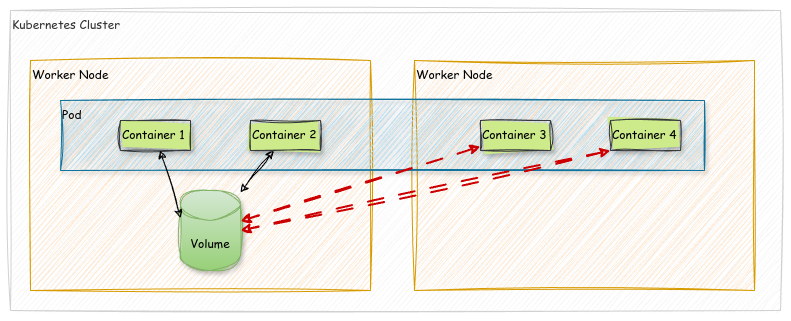
As you can see in my illustration, the volumes are created by the system and are available to all pods in the worker node, but not available to pods in other worker nodes. In our examples, we will use minikube, so we will have only one worker node, and it will be no issue for us, but just keep in mind that in production environments you will have to consider this.
Creating EmptyDir volumes
Let’s start with the simplest local volume type, the emptyDir volume. This volume is created when the pod is created
and is deleted when the pod is deleted. It is useful for caching, temporary storage, logs, etc.
apiVersion: apps/v1
kind: Deployment
metadata:
  name: webserver-deployment
spec:
  replicas: 1
  selector:
    matchLabels:
      app: webserver
  template:
    metadata:
      labels:
        app: webserver
    spec:
      containers:
        - name: webserver
          image: nginx:1.26.0
          ports:
            - containerPort: 80
          volumeMounts:             # In this section we define the volumes that we want to mount to the container
            - name: logs-volume    # This is the reference name of the volume that was defined in the volumes section
              mountPath: /var/log/nginx     # This is the path where the volume will be mounted inside the container
      volumes:                      # In this section we define the volumes that we want to use in the pod
        - name: logs-volume        # Give name to the volume that we will reference to be used in the container
          emptyDir:                 # Type of the volume, that is something like anonymous volume in Docker world
            sizeLimit: "1Gi"        # Optional, the size of the volume
            medium: Memory          # Optionally, the medium of the volume can be Memory or HDD
---
apiVersion: v1
kind: Service
metadata:
  name: webserver-service
spec:
    selector:
        app: webserver
    type: LoadBalancer
    ports:
        - protocol: TCP
          port: 80
          targetPort: 80
Download here. Before we apply it with kubectl apply -f deployment-local-volume.yaml,
I would like to metion few things here. Most of the definitions are the same as in the previous post, but we have added
the volumes and volumeMounts sections here. In the volumes section, we define the volumes that we want to use in
the pod. In this case we have only one volume, called the cache-volume, but you can give it any unique name. This
volume is of type emptyDir, which will tell kubernetes to create an empty directory on worker node and use it. I also
added two optional parameters. The first one is sizeLimit, which is the size of the volume. This will be shared with
all replicas, therefore, make sure to have enough space. The second one is medium, which defaults to HDD, but
in this case I want to leverage the speed of RAM Memory for caching. As you can see the volumes section is under the
pod spec section, which means that volumes defined this way will be available only to containers in this pod. In the
volumeMounts section of each contianer we define the volumes that we want to mount to the container. In this case we
have only one volume, and we use the name parameter to reference name of the volume cache-volume. The mountPath
parameter is the path where the volume will be mounted inside the container. Let’s apply the definition with:
$ kubectl apply -f deployment-local-volume.yaml

deployment.apps/webserver-deployment created
service/webserver-service created
and after that, we can see in the browser that our service is up and running with:
$ minikube service webserver-service

|-----------|-------------------|-------------|---------------------------|
| NAMESPACE |       NAME        | TARGET PORT |            URL            |
|-----------|-------------------|-------------|---------------------------|
| default   | webserver-service |          80 | http://192.168.49.2:31370 |
|-----------|-------------------|-------------|---------------------------|
🎉  Opening service default/webserver-service in default browser...
If we get the pod name with kubectl get pods, then we can check what is stored in our volume of the container with:
$ kubectl exec -it webserver-deployment-5dfcf7b878-drxkz -- ls /var/log/nginx

access.log  error.log
and we can see that how much of our 1 gigabyte volume is used with:
kubectl exec -it webserver-deployment-5dfcf7b878-drxkz -- df -h /var/log/nginx

Filesystem      Size  Used Avail Use% Mounted on
tmpfs           1.0G  8.0K  1.0G   1% /var/log/nginx
Ok, I know this example was very basic, and we didn’t do anything interesting with the volume. But I just wanted to show you how you could define volumes; that I call local or inline. In the next example, we will see how to use the volume that could be used across multiple pods.
Remote Volumes
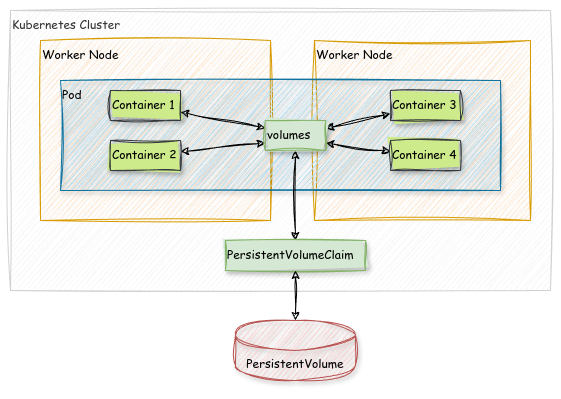
Remote volumes are volumes that are created outside the worker nodes where the pods are running. These volumes are persistent, often called persistent volumes, and are useful for storing data that needs to be shared between pods, like databases, etc. They are persistent from the kubernetes point of view as kubernetes doesn’t have control over their persistency, so please make sure you are not storing data in queues like Kafka, where data might expire. When pods are destroyed, these volumes are usually just unmounted and their content persists. For the above reasons, we don’t specify them in the pod definition, but as PV (PersistentVolume) and PVC (PersistentVolumeClaims) objects.
Persistent Volumes
In next part, we want to create a Persistent Volume (PV) object that is a cluster-wide resource that represents a piece of storage in the cluster. It is a resource in the cluster just like a worker node is a cluster resource. PVs are volume plugins like Volumes, but have a lifecycle independent of any individual pod that uses the PV.
We also create a Persistent Volume Claim (PVC) object that is a request for storage. In a sense, it is similar to a pod, because pods consume worker node resources same as PVCs consume PV resources. Pods can request specific levels of resources (CPU and Memory). PVCs can request specific size and access modes (e.g., can be mounted once read/write or many times read-only).
And finally in deployment definition, in the volumes section we will reference the PVC that we want to use in the container.
So we are going to create a persistent volume of type hostPath for simplicity. This type of volume is used to mount
a directory from the host node’s filesystem into your pod. This is useful for development and testing purposes, but not
recommended for production environments. Please also make sure that you don’t use local volumes such as hostPath in
cloud on shared clusters, as they pose a security risk.
apiVersion: v1
kind: PersistentVolume            # The definition of the Persistent Volume object
metadata:
  name: my-pv                     # The unique name of the PV
spec:
  capacity:
    storage: 1Gi                  # The size limit of this volume
  volumeMode: Filesystem          # Mode of the volume can be Block or Filesystem
  accessModes:
    - ReadWriteOnce               # Access mode of the volume, can be ReadWriteOnce, ReadOnlyMany, ReadWriteMany
  hostPath:
    path: /data                   # Path on the host node that we want to use, not in the container
    type: DirectoryOrCreate       # The Type of the path can be DirectoryOrCreate, Directory, FileOrCreate, File
---
apiVersion: v1
kind: PersistentVolumeClaim       # The definition of the Persistent Volume Claim object
metadata:
  name: my-pvc                    # Choose unique name of the PVC
spec:
  volumeName: my-pv               # The unique name of the PV that we want to use
  accessModes:
    - ReadWriteOnce               # Access mode of the volume, can be ReadWriteOnce, ReadOnlyMany, ReadWriteMany
  resources:
    requests:
      storage: 1Gi                # The size of the volume that we want to use must be less or equal to the PV size
Download here. We will also make smallish changes in the deployment definition to use our new PVC.
apiVersion: apps/v1
kind: Deployment
metadata:
  name: webserver-deployment
spec:
  replicas: 1
  selector:
    matchLabels:
      app: webserver
  template:
    metadata:
      labels:
        app: webserver
    spec:
      containers:
        - name: webserver
          image: nginx:1.26.0
          ports:
            - containerPort: 80
          volumeMounts:
            - name: logs-volume
              mountPath: /var/log/nginx
      volumes:
        - name: logs-volume
          persistentVolumeClaim:   # In this case, we are referencing the PVC that we created instead of emptyDir
            claimName: my-pvc      # This is the unique name of the PVC that we want to use
---
apiVersion: v1
kind: Service
metadata:
  name: webserver-service
spec:
  selector:
    app: webserver
  type: LoadBalancer
  ports:
    - protocol: TCP
      port: 80
      targetPort: 80
Download here and now that we have both files, we can apply them with:
$ kubectl apply -f deployment-service.yaml -f host-pv-pvc.yaml

deployment.apps/webserver-deployment created
service/webserver-service created
persistentvolume/my-pv created
persistentvolumeclaim/my-pvc created
Conclusion
Amazing, we have learned how to use volumes in Kubernetes. We have seen how to use local volumes, that are created on the
worker nodes where the pods are running, and how to use remote volumes, that are created outside the worker nodes. We
have also created a Persistent Volume and Persistent Volume Claim objects, and used them in the pod definition. Although
we used only 2 types of volumes, the emptyDir and hostPath, but there are many more types of volumes in Kubernetes,
and I encourage you to explore them further on your own. You can start with the official documentation on
volumes. You will see there are many deprecated and removed ones
as they decided to rather define interface called CSI (Container Storage Interface) that allows third-party storage
providers to develop their own storage drivers. But that is a topic for another post, stay tuned. :)