Kubernetes basics
For some time there were two great tools called DockerSwarm and Kubernetes, both trying to achieve similar goals, to be orchestration tools for containerized applications, but at some point it was clear that one of them became more popular among developers and became an industry standard. We could speculate saying that developers are lazy, and they don’t want to write complex yaml files for their deployments, but the truth is that Kubernetes is more flexible and extensible tool, provides more mature features, like self-healing, rollouts and rollbacks, secret management, auto-scaling and I mean really large scale applications, adoption by big companies like Google, Microsoft, Amazon, IBM, etc. and can run in single cloud, multi-cloud, on-premises, hybrid cloud, etc. This might take longer to learn, but at the end it is worth it. So buckle up and let’s dive into the Kubernetes basics.
Glossary
Let’s describe the main components of Kubernetes before we start to create and use them. It will certainly be englightening to know what we are going to install and work with.
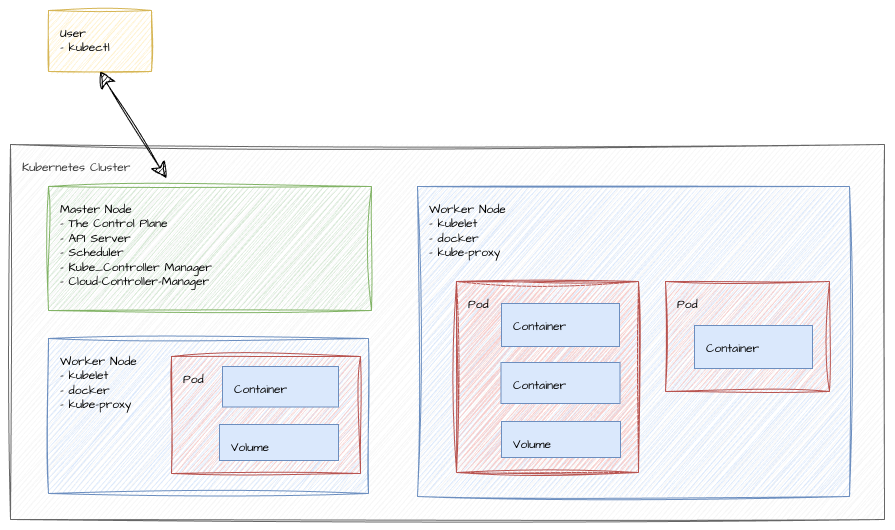
kubectl- a command line tool for controlling Kubernetes clusters. It allows you to run commands against Kubernetes clusters. You can usekubectlto deploy applications, inspect and manage cluster resources, and view logs. This cli communicates with the Kubernetes API server.Node- Kubernetes cluster consist of at least two nodes, the Master Node and the Worker Node.Master Node- is responsible for managing the cluster, scheduling applications, and maintaining the desired state of the cluster. There is only one Master Node in a Kubernetes cluster and this is where the Kubernetes control plane runs, including the API server, scheduler, and controller manager.Worker Node- is responsible for running the actual applications and workloads. The Worker Node is where the containers will be launched and all your applications will run. The Worker Node is managed by the Master Node.The Control Plane- is a collection of components that manage the Kubernetes cluster. The Control Plane makes global decisions about the cluster (for example, scheduling), as well as detecting and responding to cluster events (for example, starting up a new pod when a deployment’s replicas field is unsatisfied).Scheduler- watches for newly created Pods with no assigned node, and selects a node for them to run on.kubelet- an agent that runs on each Worker Node in the cluster. It makes sure that containers are running in a Pod.kube-proxy- a network proxy that runs on each node in your cluster, implementing part of the Kubernetes Service concept.Pod- a group of one or more containers, with shared storage/network, and a specification for how to run the containers. A pod can have multiple containers, but usually it is just one container.Deployment- a higher-level concept that manages pods and provides declarative updates to pods along with a lot of other useful features. A deployment is responsible for creating and updating instances of your application.Service- an abstraction which defines a logical set of Pods and a policy by which to access them. Services enable a loose coupling between dependent Pods. A Service is a Kubernetes resource that lets you expose your application to external traffic.
Prerequisites
In this blog post I will delve into the fundamental concepts of Kubernetes, an open-source
platform designed to automate deploying, scaling and managing containerized applications. You will not need much,
actually we will do everything locally on your PC. But still, in addition to docker installed on your machine, we will
need the following tools:
kubectl- cli toolminikube- basically a simple local kubernetes cluster, that runs in a single VM on your local machine.
Installation of the 2 above tools is beautifully described in the official documentation therefore please get them installed on your machine before we continue.
Starting minikube
A Kubernetes cluster needs few components, but to be able to create all of them on a single computer, we will need
a Hypervisor, that will create Virtual machine for us. The entire cluster will run in this VM and various operating
systems provide different flavours of Hypervisors. For example, on Windows you can use Hyper-V, on MacOS you can use
HyperKit, on Linux you can use KVM, VirtualBox, etc. In addition, docker can also be used as a virtualization tool
and that is what we will use in this blog post. The simplest Kubernetes cluster needs at least one Worker Node and one
Master Node. The Master Node is responsible for managing the cluster, scheduling applications, and maintaining the desired
state of the cluster. The Worker Node is responsible for running the actual applications and workloads. The Worker Node
is where the containers will be launched. The Master Node is where the Kubernetes control plane runs, including the API
server, scheduler, and controller manager. With minikube we will have both Master and Worker Node in a single VM on
our local machine. Amazing, isn’t it? So what I just said, you can create with:
minikube start driver=docker
And you will get output similar to this:
😄  minikube v1.32.0 on Ubuntu 22.04
✨  Using the docker driver based on user configuration
❗  docker is currently using the zfs storage driver, setting preload=false
📌  Using Docker driver with root privileges
👍  Starting control plane node minikube in cluster minikube
🚜  Pulling base image ...
🔥  Creating docker container (CPUs=2, Memory=16000MB) ...
🐳  Preparing Kubernetes v1.28.3 on Docker 24.0.7 ...
▪ Generating certificates and keys ...
▪ Booting up control plane ...
▪ Configuring RBAC rules ...
🔗  Configuring bridge CNI (Container Networking Interface) ...
🔎  Verifying Kubernetes components...
▪ Using image gcr.io/k8s-minikube/storage-provisioner:v5
🌟  Enabled addons: storage-provisioner, default-storageclass
🏄  Done! kubectl is now configured to use "minikube" cluster and "default" namespace by default
then we can check that it is running with:
minikube status
And you will get output similar to this:
minikube
type: Control Plane
host: Running
kubelet: Running
apiserver: Running
kubeconfig: Configured
That basically means that the minikube is running and we can start deploying our applications on it.
Starting the dashboard
Today, I will do everything on the command line, so if you like more visual views, you can use dashboard that is built-in to minikube. Let’s add addon for metrics and open the dashboard with:
minikube addons enable metrics-server
minikube dashboard
This should hold your terminal and open your browser with the dashboard page. As of now there is not much to see, and it will be empty as we didn’t deploy anything yet. You can come here anytime later to check any status of your deployments, pods, services, etc. But throughout blog post I will mostly focus on the command line.
The Deployment object
There are two approaches how to work with Kubernetes, the Imperative and the Declarative approach. In this blog post
I will use imperative approach (but I plan to do another blog post with some more advanced features using declarative
approach). First we create a deployment for our web-app, for example with nginx web-server:
kubectl create deployment web-app --image=nginx
this sends command to Master Node to create a deployment with name web-app and image nginx. Scheduler will then analyze currently running Pods and finds the best Worker Node for the new Pods. Schedule the deployment to a Worker Node, and the kubelet on that node will start the pod. Kubelet is managing the Pods and the containers running in a Worker Node. Then we can check the status of the deployment and pods with:
kubectl get deployments
kubectl get pods
And we should see something like this:
NAME      READY   UP-TO-DATE   AVAILABLE   AGE
web-app   1/1     1            1           22s


NAME                      READY   STATUS    RESTARTS   AGE
web-app-cfc5c9bdf-wq5zl   1/1     Running   0          78s
The nginx server will have an internal IP address in the Kubernetes cluster, but it is not exposed to the outside world. These internal IPs will constantly change as the containers/pods go up and down. For our web server we want more permanent IP address. And for that reason we have Services.
The Service object
Services group Pods with a shared IP address and DNS name. Effectively making our web server accessible from outside.
Without Service, the only way to access the web server would be to use kubectl exec to run a command inside the Pod,
which is really not practical. Reaching the Pod directly from outside the Cluster is not possible at all without
Services.
There are 4 types of services. The documentation describes them in detail therefore I will not go into much details here, but I mention them briefly:
- ClusterIP (default) - Exposes the Service on an internal IP in the cluster. This type makes the Service only reachable from within the cluster.
- NodePort - Exposes the Service on the same port of each selected Node in the cluster using NAT. Makes a Service accessible from outside the cluster using :. Superset of ClusterIP.
- LoadBalancer - Exposes the Service externally using a cloud provider’s load balancer. NodePort and ClusterIP Services, to which the external load balancer will route, are automatically created. Superset of NodePort.
- ExternalName - Maps the Service to the contents of the externalName field (e.g. foo.bar.example.com), by returning a CNAME record with its value. No proxying of any kind is set up.
and in this case I have decided to use LoadBalancer. The below command will create a new Service, where it exposes our nginx deployment on the port 80.
kubectl expose deployment web-app --port=80 --type=LoadBalancer
After running the above command, we can check the status of the service with:
kubectl get services
NAME         TYPE           CLUSTER-IP   EXTERNAL-IP   PORT(S)        AGE
kubernetes   ClusterIP      10.96.0.1    <none>        443/TCP        1d
web-app      LoadBalancer   10.96.8.62   <pending>     80:31745/TCP   18s
The kubernetes service is default service and was created when we started the minikube. The web-app service is the
one we just created. The EXTERNAL-IP is in pending state and would be available soon in normal circumstances.
But in our case the minikube runs on our local PC, and it is set in such wat that it doesn’t expose our PC to world, so
it stays in pending state forever on the minikube. Because of that, the minikube has us covered with specific command
that displays table with the URL to access the service and opens the browser with that URL. The command is:
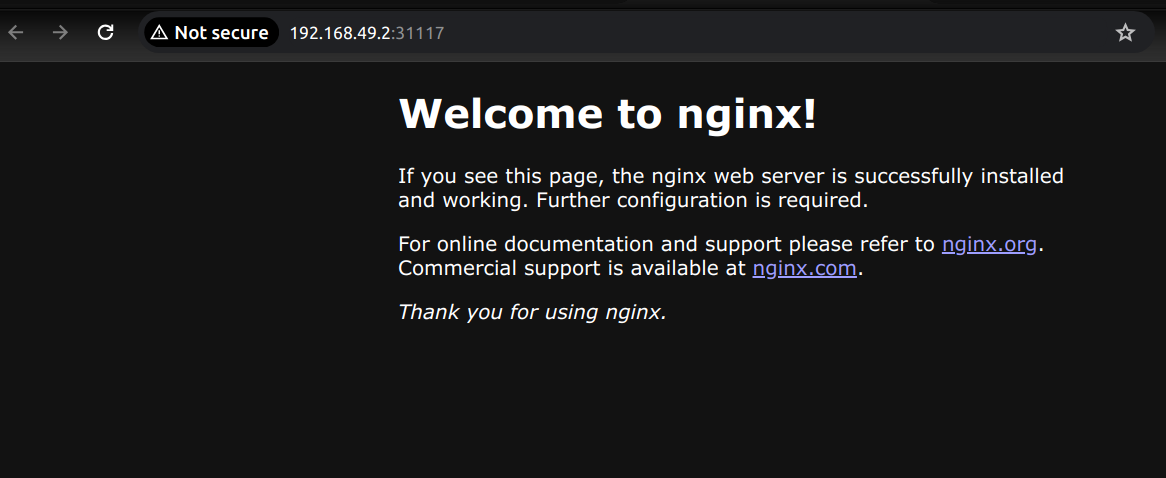
minikube service web-app
|-----------|---------|-------------|---------------------------|
| NAMESPACE |  NAME   | TARGET PORT |            URL            |
|-----------|---------|-------------|---------------------------|
| default   | web-app |          80 | http://192.168.49.2:31117 |
|-----------|---------|-------------|---------------------------|
🎉  Opening service default/web-app in default browser...
Scaling the app
We have deployed our first app on Kubernetes. I know it is not much, but it is honest work. Lets try scaling this app for example to 3 instances/pods, with:
kubectl scale deployment web-app --replicas=3
kubectl get pods
NAME                      READY   STATUS    RESTARTS   AGE
web-app-cfc5c9bdf-pnzgp   1/1     Running   0          7s
web-app-cfc5c9bdf-rsw4f   1/1     Running   0          7s
web-app-cfc5c9bdf-wq5zl   1/1     Running   0          16m
We have scaled our app to 3 instances, that are served through LoadBalancer, so if each of those pods would crash for any reason, then the Kubernetes cluster would bring pods count to 3 replicas to make sure that our app is available. Just to make it sure, kubectl in this case will not add more Worker Nodes, it will just create more Pods on the existing Worker Node. Quite powerful tool, isn’t it? Guess what would be the command to scale it back to 1 instance? Exactly, the same command, just change the number of replicas to 1 and Kubernetes will terminate random 2 pods and keep up just 1.
kubectl scale deployment web-app --replicas=1
Deploying new deployment object
Let’s assume that you made changes to your code, then you built your docker image with the code and pushed it to the
docker registry with new tag 1.23. And right now you would like to update the deployment in your kubernetes cluster
with the new image. You can tell kubernetes to set the image of the deployment/web-server to nginx:1.23 with
the following:
kubectl set image deployment/web-app nginx=nginx:1.23
Note: If you don’t use tags in your docker images or hashes, then kubernetes will not download the new image, because it will think that the image is the same as the one that is already running. Therefore, always use explicitly tags or hashes when specifying your docker images for deployments. Guess, how would you roll back the deployment to the previous version? Exactly, you would just set the image to the previous version tag.
Resolving deployment issues
If you have any issues with your deployment, you can check the logs for all pods with kubectl logs -l app=web-app.
This will show you logs for all pods that have label app=web-server. If you want to see logs for specific pod, you can
get the pod name with kubectl get pods and then use the pod name in the logs command kubectl logs <pod-name>
But what if logs show no issue, because the pod is not even starting? You can check the events with kubectl get events
For example, if the pod is not starting because of the image, like you specified nonexistent image tag:
kubectl set image deployment/web-app nginx=nginx:987
Usually what kubernetes does is that it tries to pull the image from the registry. The image is not found and so
it will not end the pod but the back-off limit is reached, and you are in kind of broken state. The old image is still
up, and you can’t deploy the new one because it is stuck in ErrImagePull state.
NAME                       READY   STATUS         RESTARTS   AGE
web-app-557cdcf48c-2495k   1/1     Running        0          4m33s
web-app-859d76db9-g9qrw    0/1     ErrImagePull   0          2s
You can check the rollout status and fix this by rolling back last deployment with undo command to previous
deployment:
kubectl rollout status deployment/web-app
kubectl get pods
kubectl rollout undo deployment/web-app
or even rollback to specific revision with:
kubectl rollout undo deployment/web-app --to-revision=1
Finally check what you did with:
kubectl rollout history deployment/web-app
Cleaning up
Well done, that is enough basics for today. To clean up everything that we made today, we can delete the deployment and service and then stop minikube cluster:
kubectl delete service nginx
kubectl delete deployment web-app
minikube stop
And that’s it. We have cleaned up our environment.
Conclusion
Kubernetes is a tool for managing containerized applications in docker, actually in pods. It might seem a complex system at first, but the simple and flexible components of the system can be used in so many different ways. As you get through the confusing parts, I can promise that you will become another developer managing and orchestrating all the microservices in cloud environment. I hope that this blog post helped you to understand the basics of Kubernetes and in the next blog post I plan to cover more advanced topics like declarative approach, secrets, configmaps, etc.