Docker Volumes
I am using docker in personal and professional projects for a couple of years now. Like everybody else, I learned it as I went along and learned as little as I needed to know to be able to deliver what I wanted. I never had a chance to sit down and look deeper into it (as no one does these days). But from time to time, I like to dive deeper to figure out more about handling data with docker. And then I thought to myself that what I summarized for myself mighty actually be helpful for someone else too. Therefore, if you are interested in knowing more about docker volumes, you are in the right place. All code covered in this blog post is also in GitHub repo if you would like to follow along. And if you are not interested, you are still in the right place, but you can skip this article.
What Data we might want to store?
Before we start, let’s think about what kind of data we might want our docker container to use. There are many different types of data, such as:
- Application data
- Temporary app data
- Configuration files
- Log files
- Dependencies and libraries
- Database files
- User uploads
- etc.
As you can see, these are all different types of data, and they all have different requirements. For example, some data might need to be persistent or read-only, while other data might be temporary. Some data might need to be shared between containers, or isolated to specific container. We might want some data to persist even when container and image are rebuilt. I will try to group them and explain them in the next sections.
| specifics | image | container | host machine | |
|---|---|---|---|---|
| Application Data | code, usually added to image, read-only | X | ||
| Temporary App Data | user input, etc. Produced in container, lost when container stops, read-write | X | ||
| Permanent App Data | user account, etc. Produced in container, should persist when container is removed, read-write | X | X |
Application Data
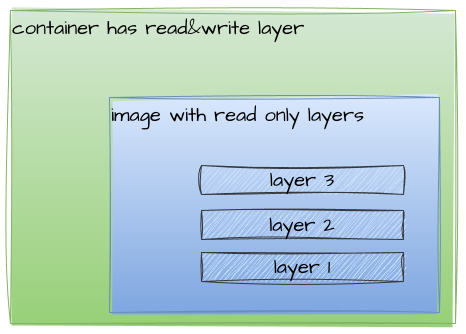
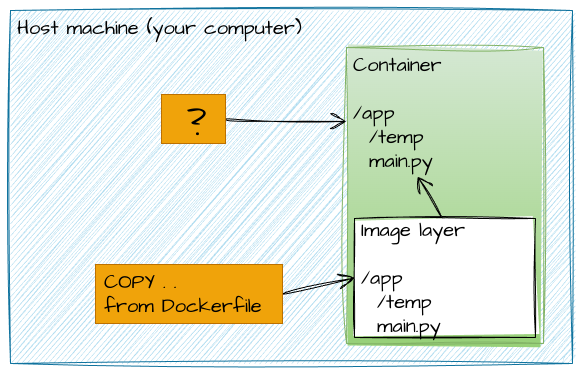
When we build a docker image, we can add data to it. This data is usually the code of our application altogether with installed dependencies and libraries. This data are read-only on image, and cannot be changed or deleted. So when you build a container based on such image, this data is available to the container. This is a good way to distribute our application, because we can be sure that the container will have all the necessary data to run the application. We will create a simple Python web app called main.py:
from fastapi import FastAPI
from starlette.staticfiles import StaticFiles
app = FastAPI()
app.mount("/temp", StaticFiles(directory="temp", html=True), name="temp")
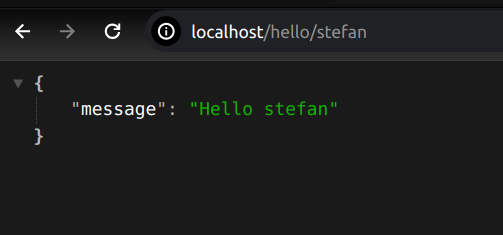
@app.get("/hello/{name}")
async def say_hello(name: str):
with open(f"temp/welcomed.txt", "at+") as file:
file.write(f"{name}\n")
return {"message": f"Hello {name}"}
And then we will create a Dockerfile to build an image from it:
FROM python:3.10-slim-buster

WORKDIR /app
COPY . .
RUN pip install -r requirements.txt
EXPOSE 80

CMD ["uvicorn", "main:app", "--host=0.0.0.0", "--port=80"]
Finally, we create an image from this Dockerfile and run a container from it:
docker build -t my-app .
docker run -d -p 80:80 --name my-app-container my-app
Now we can access our web app at http://localhost/docs. This is a simple example, but it shows how we can add data to
an image and use it to run an application. Nothing really special here, but it is a good start. The main distinction
from data perspective is that the data is read-only on the image and container can access it.
Temporary App Data
When we run our container, we can produce data in it, but this data will be stored in container layer and therefore it
is temporary because it will be lost when the container is removed. As you can see we created endpoint /hello/{name}
that writes the name to a file in temp folder inside container.
and now we can see the content of the file by visiting http://localhost/temp/welcomed.txt:
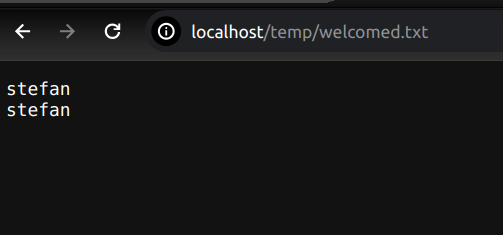
So we just proved that the container can write data. But what happens when we remove the container and run it again?
# stop and remove the container
docker stop my-app-container
docker rm my-app-container

# run the container again
docker run -d -p 80:80 --name my-app-container my-app
and then we visit http://localhost/temp/welcomed.txt:
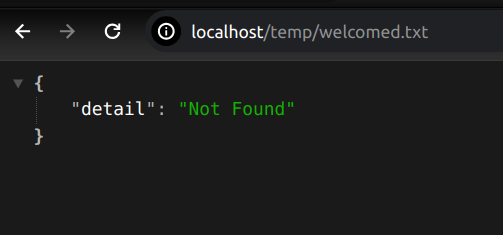
The data is lost. It is because the temp data were stored in container layer and when we removed the container, the data were removed as well. And when we recreated the container the new empty temp folder was created in container.
If we would just stop and restart container, without removing it, the previous data would be still available in container layer after restart. But in most of the cases, we want to deploy new version of our application, so we create a new image and run a new container from it. And in this case, the data from previous container would be not available in our newly deployed container. As we see container layer is not very persistent.
Permanent App data
So we want the data to persist even when the container is removed and for that we have docker volumes. Volumes are
a way to store data outside the container layer. Basically, docker reserves special folder on hard drive of you host
machine and mount it into container. That special place is hidden in your host machine, and we shouldn’t really care
where, because docker gives us all necessary tools to manage it.
It is worth noting that the following is true for all volumes:
- that the data in volume is not part of the image or container layer
- that volumes are attached to containers and can be shared between containers
- that the data in volume is read-write, unless specified otherwise
- that the data in volume is persistent
Volumes
It is now clear that if we want to have more persistent data in our docker containers, we will need to use volumes and due to a couple of flavours of volumes, we will now see where they differ. So let’s go through them.
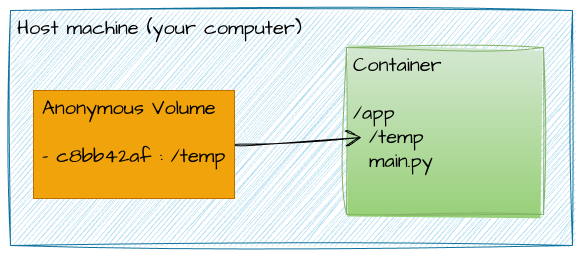
Anonymous volumes
Let’s create a very same docker image, but this time we will create a volume for temp folder. We will use VOLUME
instruction in Dockerfile to create this volume as follows:
FROM python:3.10-slim-buster
WORKDIR /app
COPY . .
RUN pip install -r requirements.txt
EXPOSE 80
VOLUME /app/temp
CMD ["uvicorn", "main:app", "--host=0.0.0.0", "--port=80"]
Now we can build an image from this Dockerfile and run a container from it:
docker build -t my-app-anon-volume -f anon-volume.Dockerfile .
docker run -d -p 80:80 --rm --name my-app-anon-volume-container my-app-anon-volume
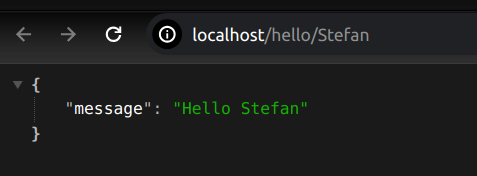
And when our container is running, we will welcome Stefan again at http://localhost/hello/Stefan:
and visit http://localhost/temp/welcomed.txt:
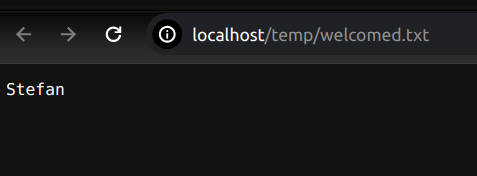
As we can see, the file is there, and it contains the name. This is great, so we use volumes to store our data. But what happens when we stop and remove the container and run it again?
docker stop my-app-anon-volume-container
docker run -d -p 80:80 --rm --name my-app-anon-volume-container my-app-anon-volume
and then we visit http://localhost/temp/welcomed.txt.
We can see that the file is not there. Wait a minute, what?
But Stefan, why are you
telling us about these volumes if they don’t persist the data? Well, the data persist only as long as the container
exists. I used --rm flag when running the container, and this flag removes the container when it stops. When we
created this container, docker also created an anonymous volume for us. Because we didn’t name it, it was given some
random name. But when we removed the container the volume was detached and when we recreated the container, there was no
way telling to docker to reuse our previous anonymous volume with our data or to reference to it. So docker just created
another volume with new random name for us and this volume is empty again. Just before we stop the container, let’s
check the volumes:
docker inspect -f '{{ .Mounts }}' my-app-anon-volume-container
docker volume ls
DRIVER    VOLUME NAME
local     c9c9e2f1be537033fd7f96671d801adee6124c4937e1b03d864e53b2fcb2eb6f
and we can see that there is a volume with random name attached to our container. Now when we stop and remove the container, the volume will be removed as well:
docker stop my-app-anon-volume-container
docker volume ls
We just learned that anonymous volumes are persisting only for the lifetime of the container when --rm flag is used.
If you start container without that flag, the anonymous volumes will not be removed. Actually, why would we
want to keep a volume with data, if nothing will be ever referencing back to it. So cleaning them up kind of makes
sense. Also remember to use --rm flag when running a container with anonymous volumes, because if you don’t, you will
end up with a lot of anonymous volumes that you don’t know what they are for. You can remove unused volumes with
docker volume rm $(docker volume ls -qf dangling=true).
But what if we want to persist the data even when the container is removed? We need something so that we can reference back to it, let’s call them named volumes.
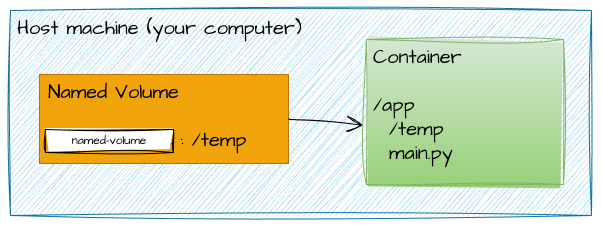
Named volumes
With named volumes we will name the volume on host machine, and we will define a path in the container where it should
map to. Let’s reuse the first Dockerfile and re-create an image and then run a container from it, but this time we will
add -v flag to create a named volume called named-volume and map it to /app/temp in the container:
docker build -t my-app .
docker run -d -p 80:80 --rm --name my-app-container -v named-volume:/app/temp  my-app
Now we can welcome Stefan again at http://localhost/hello/Stefan and visit http://localhost/temp/welcomed.txt to
see that it Stefan was welcomed. Cool, let’s stop and remove the container, run it again:
docker stop my-app-container
docker run -d -p 80:80 --rm --name my-app-container -v named-volume:/app/temp  my-app
and visit http://localhost/temp/welcomed.txt:
The data is still there. We can see that named volumes are persisting the data even when the container is removed.
You could also see that volumes are listed in docker volume ls command. And when we remove the container, the volume
will still be there.
docker stop my-app-container
docker volume ls
DRIVER    VOLUME NAME
local     named-volume
So first time we have persistent mounts, where our application can write and this data can be reattached for example to newly deployed application with latest code. This is ideal place to store user uploads, logs, etc.
If you remember, we added our entire codebase into docker image when we built it, and if we would like to update the codebase, we would need to rebuild the image and redeploy the container. I wish there would be a way to update the code without rebuilding the image.

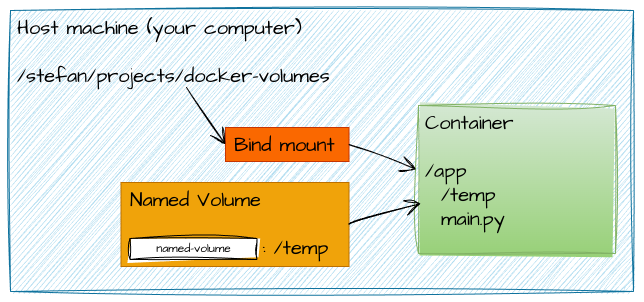
And there is, we can use bind mounts.
Bind mounts
With volumes, we don’t really know where the data is stored on host machine, as that is managed by docker. That is
different with bind mounts, because we can specify the path on host machine where the data should be stored. In addition,
our application can read and write to this path same as we can do read and write to this path on host machine. If we
remove the container, the data will still be there on host machine. This makes it ideal candidate when we want to make
changes to our code from host machine and see the changes in the container without rebuilding the image and redeploying
the container. In a sense, we can say that bind mounts are persistent and read-write, but they are not part of the image
or container layer. Because bing mounts are not part of the image, we can use them to store configuration files, logs,
etc. Bind mounts are not part of image or container layers, therefore we will not use VOLUME instruction in Dockerfile
to create them. Instead, we will use -v flag when starting the container to create them. Let’s create a bind mount for
our project folder and map it to ./app on host machine:
docker run -d -p 80:80 --rm --name my-app-container -v named-volume:/app/temp -v /stefan/projects/docker-volumes:/app my-app
Check out the second -v flag, where we are using /stefan/projects/docker-volumes to map the current directory and all
of its content to /app in the container. It is important to use absolute path, not relative path. For running on
Linux/mac you can use -v $(pwd):/app and on Windows you can use -v %cd%:/app to map the current directory dynamically
which is helpful when the project is shared with other colleagues, and they have different directory structure.
Now we can make changes to our code on host machine and see the changes in the container without rebuilding
the image and redeploying the container. The first -v flag is the named volume that we created before. Let’s welcome
Stefan again at http://localhost/hello/Stefan and visit http://localhost/temp/welcomed.txt:
As you can see the server from docker container is telling us that the welcomed.txt is there and it holds the welcomed
names, but when we check our local temp folder on host machine, we can see that the welcomed.txt file isn’t there.
That is because the temp folder in the container is not mapped to the temp folder on host machine but to the named volume.
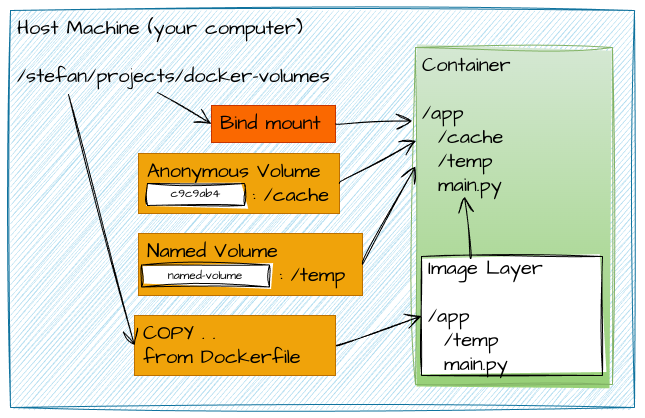
We can also see that our newly bind mounted code is overriding the image layer with code. And although we first mounted
named volume and then bind mount, the named volume is taking precedence over the bind mount. This is because docker
resolves the order of volumes in a way that the deeper path is taking precedence over the more shallow path, or that the
more explicit path has higher priority. Therefore /app/temp from named volume takes precedence over /app from
bind mount.
I mentioned that with bind mount we can make changes to our code on host machine and see the changes in the container without rebuilding the image and redeploying the container. The code is really updated in the container, but we need to take into consideration two things:
Firstly, the changes to dependencies would not be updated. That is because we didn’t install dependencies locally. We installed them when we built the image and that is part of the image layer. So if we would like to update the dependencies, we would need to rebuild the image and redeploy the container. Alternatively, we could use named volume to store dependencies and install them at container start up.
Secondly, the changes to the code would not be visible in the python webserver. That is because the FastApi python server is already running in container, and it has no way of knowing that code has changed. We would need to restart the server for changes to take effect. Let’s create Dockerfile for bind mounts:
FROM python:3.10-slim-buster

COPY requirements.txt  requirements.txt
RUN pip install -r requirements.txt

WORKDIR /app
VOLUME ["/app/temp"]

EXPOSE 80
CMD ["uvicorn", "main:app", "--reload", "--host=0.0.0.0", "--port=80"]
We don’t need to copy the entire codebase into the image, because we will use bind mount to map the codebase to /app
in the container. We will only add requirements and install them into image. We also added --reload flag to uvicorn
command, so that the server will watch the files and will restart server when the code changes. Now we can build an
image from this Dockerfile and run a container from it:
docker build -t my-app -f bind-mount.Dockerfile .
docker run -d -p 80:80 --rm --name my-app-container -v named-volume:/app/temp -v $(pwd):/app my-app
Now, if you change any files in the codebase, the server in container will restart, and you will see the changes without need to restart the container. This is great setup for local development.
The bind mounts are not displayed in docker volume ls command, because they are not managed by docker, but by the
operating system. You can see them in docker inspect -f '{{ .Mounts }}' my-app-container command.
Noteworthy features
Read-only volumes
The volumes in docker world are read-write by default, which means that docker can read from these volumes but also
write to them. It might be useful to create read-only volumes, for example we might want docker to be able to read/use
codebase, but we don’t want the code to be changed by the application in container. For that, we can use ro flag after
the volume path. This can be used on all types of volumes or bind mounts, but makes the most sense on bind mounts where
we want to protect the data. Let’s create a read-only volume for our codebase:
docker run -d -p 80:80 --rm --name my-app-container -v named-volume:/app/temp -v $(pwd):/app:ro my-app
Docker Ignore
When we build an image from a directory, for example with COPY . ., docker will copy all the files from the directory
to the image. But we might not want to copy all the files, for example we might not want to copy the __pycache__ or
.git folders. We can use .dockerignore file to specify which files and folders should be ignored. The .dockerignore
file works the same as .gitignore file, to specify which files and folder should be ignored. An example content of
dockerignore would be:
__pycache__
.git
.vscode
.idea
.venv
.DS_Store
Backup your volumes
If your volumes contain some important data, it is good practice to back up the data. You can use docker cp command
to copy the data from the container to the host machine or to the new volume. The syntax is following
docker cp [container_name]:[path_in_container] [path_on_host]. Let’s copy the data from our container to the host
machine:
> docker cp my-app-container:/app/temp backup
Successfully copied 3.07kB to /home/stefan/Projects/docker-volumes/backup
TL;DR
As you can see from the above, we can attach various volumes to our container, and each of them has specific properties and use case. So there is not one right approach, but it depends on the requirements. Here is a summary:
| Command | Creates | resides | lifetime |
|---|---|---|---|
| COPY . . | adds data to image | in image layer | all containers from this image |
| docker run -v /app/temp | Anonymous Volume | in container layer | until container exists |
| docker run -v temp:/app/temp | Named Volume | on container on host | this and future containers, can be shared |
| docker run -v /path/on/host:/path/in/container | Bind Mount | on host machine | exists independently of docker, can be shared or reused |
| docker run -v /path/on/host:/path/in/container:ro | Read-only Volume | on host machine | exists independently of docker, can be shared or reused |
Conclusion
In this article, we learned the obvious about docker volumes, that they can store data, but in addition also that:
- for different types of data we might want to use different types of volumes
- that volumes are a way to store data outside the image layer or even outside the container layer
- that volumes can be shared and reused between containers
- that we have anonymous, named and bind volumes and that each of them has specific properties and use case.
I hope that you found this article helpful and that you learned something new. If you have any questions or comments, please let me know. I would be happy to help you.