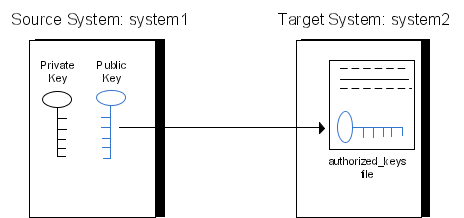
In previous post (Part 1) I showed you how to create the SSH key pair. Today we are going to install the public key on server, that we want to use. The point of installing the Public key is to get to the target server, locate the authorized_keys file (usually in home directory inside .ssh folder) and add our public key to this file. There may be other public keys, and we shouldn’t overwrite them with our key, but to append our key at the end of file. There are many ways how you can install the public key, so I will show you few of them. Don’t learn this on production server. You may cause some error or cause that nobody will be able to SSH into the server. 5 out of 5 Linux Gurus recommend to learn this on your virtual box or some testing machine

1a. Using ssh-copy-id
You can copy the public key into new machine’s authorized_keys file using the ssh-copy-id command:
ssh-copy-id user@12.34.56.78
Please replace the user with the username on that server and replace the 12.34.56.78 with the ip address of the server.
Alternatively you can use the hostname of server, for example: ssh-copy-id admin@skey.uk
1b. Using SSH
As a linux newbie you can do following 4 commands:
    cat ~/.ssh/id_rsa.pub
    ssh user@12.34.56.78
    mkdir -p ~/.ssh
    cat >>  ~/.ssh/authorized_keys
Explanation of the above code:
- we will copy our public key called
id_rsainto clipboard - then we will login with SSH to target server
- then we make sure the .ssh folder in home directory exist by creating it
- and finally we paste the clipboard (containing our public key) into authorized_keys file
Linux Gurus would do the same as above, but in one line:
cat ~/.ssh/id_rsa.pub | ssh user@123.45.56.78 "mkdir -p ~/.ssh && cat >> ~/.ssh/authorized_keys"
2. Installing public SSH key
Doesn’t matter if you go newbie or pro, you should see something like:
    The authenticity of host '12.34.56.78 (12.34.56.78)' can't be established.
    RSA key fingerprint is b1:2d:33:67:ce:35:4d:5f:f3:a8:cd:c0:c4:48:86:12.
    Are you sure you want to continue connecting (yes/no)? yes
    Warning: Permanently added '12.34.56.78' (RSA) to the list of known hosts.
    user@12.34.56.78's password:
Enter the password of the user on the 12.34.56.78 server, and the public key is installed in server.
3. Checking the public SSH key installation
Now, you can login to the server simply as:
ssh user@12.34.56.78
or upload any file to server through SSH:
scp /home/stefan/Doccuments/index.php user@12.34.56.78:/var/www/
To check that the authorized_keys file contains your public key or any other public keys you can output all
authorized keys on the server with:
cat ~/.ssh/authorized_keys
4. Additional SSH settings
Let’s check what is set in ssh configuration. The configuration file can slightly vary in filenames. For example ubuntu
has ssh_config and CentOS has sshd_config. Open it using nano editor and using sudo as this config file is system
protected:
sudo nano /etc/ssh/ssh_config
Let’s say that you now have your ssh key set up and your public key is installed in server. You want to limit access
only to users with installed SSH key and turn off the authentication using password. To do that, find line
with PasswordAuthentication, uncomment it by removing # on the beginning of the line and change the value to no.
The line should look like this:
PasswordAuthentication no
If you are using CentOS, try to find PermitRootLogin and set it to PermitRootLogin without-password
Save the file and to put the changes to effect type into terminal:
reload ssh
That is all for today. We learned how to add our public key to server so that server can cryptographically authenticate us and we also learned how to disable loging into server using passwords.